
Materials:
- One pair of plain patent heels (or if you’re lucky, peep toe)
- Sharpie
- X-acto knife (if you’re not so lucky)
- Fine grit sandpaper
- White craft foam
- E6000 or similar glue
- White acrylic paint
- Delta Ceramcoat acrylic paint in “Think Pink!”
- Black Folkart “Shiny” acrylic paint in “Licorice” (black)
- Delta Ceramcoat Gloss exterior varnish
- Paintbrushes
- Cup of water
- Paper Towels
For this project, I used a pair of Agent Provocateur “Katy” shoes in burgundy. I chose the Katy (and not Katie!!!) because they have the same shape and heel style/height (4″) as the “Jessica” shoes. The AP “Katie” shoes are similar but have a 5″ heel height and truly hate feet. I found them for a steal on eBay otherwise I would have gone with a less expensive pair.
(Click on images for a larger view)
Getting Started:

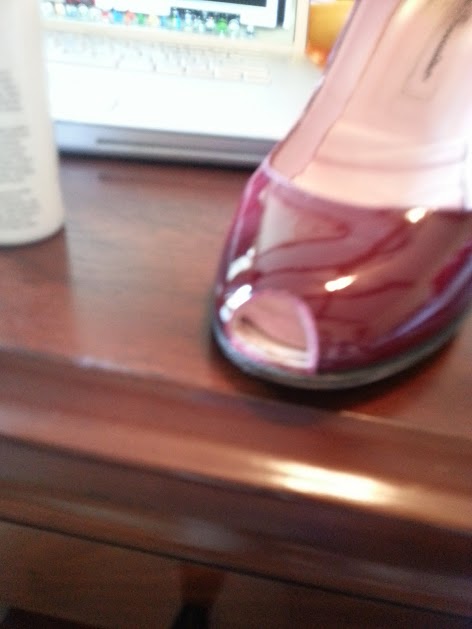
The shoes I chose were patent. For the paint to adhere, I had to use fine-grit sandpaper on all surfaces to rough it up a bit. They also did not have a peep toe. To remedy this I drew a peep toe with the sharpie and cut it out with my X-acto knife. It’s kind of difficult to cut through shoe leather with the knife, so I actually started in the middle of where I drew the shape and then cut out to the edges. I also at this point smoothed up my cuts using a combination of knife and sandpaper.

Once I was happy with the shape, I decided it was time to prime the shoes. I used a basic white acrylic paint and did several coats (like four). I had to use more coats because the base shoe was so dark. I also wanted an even primer so the pink would look even once it was applied. I wasn’t super careful with the edges while I was priming because I would be able to go over them with the black eventually. I also made sure to let each coat dry before I added another in order to keep it smooth.
At this point, I cut out two bows out of craft foam following the shape of the bows on Rose’s shoes. After cutting them out, I primed them with the same acrylic paint.

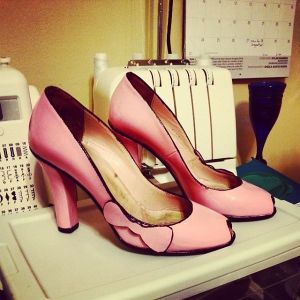
I let the shoes dry for a few hours and then touched up any areas that may have needed more primer. After everything was dry, it was time for the Pepto Pink color…I put about four coats of pink on each shoe as well. I was careful to get an even coat each time and then let it dry completely. I know it looks rather dull at this point. I also added pink to the craft foam bows. After I was satisfied with the coverage, I used the black shiny acrylic paint to do the trim work and to clean up the edges. I edged around the opening, the peep toe, and along the heel tap as I may have gotten some pink paint on it. I also added the black edges to the foam bows. I only used about two coats of black as it is a thicker paint. I then let everything dry overnight.
The next day I fixed any small blemishes and cleaned up the shoes. After that, it was time to seal them! Rose’s shoes are a very shiny patent pink, so in order to replicate it I used a gloss varnish. I painted a smooth coat over everything and let it dry. I repeated this process five more times. Always make sure each coat is dry before adding another! I can’t stress that enough. If you don’t, you’ll get air bubbles in your varnish. After everything was completely dry again I added the bows to the shoes using E6000 in a ventilated area. I can’t tell you enough how awesome this glue is! It’s super useful for shoes because it’s flexible and waterproof! Anyway, I let it all sit until the glue dried and then I was ready to go!
I hope you all find this tutorial helpful! I have gotten so much positive feedback on my shoes – people can’t tell the difference unless they look up close (I didn’t do the two black lines on the back as the heels don’t have those seams). Good luck and be sure to share your photos! ❤
Finished Product:


I forgot to mention below, the leather dye on the new pair has not cracked, but I have only worn them to one convention so far.
Thanks! I have the SA in black. And a black closed toe pair too. I’m tempted to try it on the closed first. When you sanded it down, how did you keep it smooth?
The fine grit sand paper kept everything smooth. I used a combination of 600 and 800 grit sandpaper (honestly the finer you can get the better). With the shoes being black, they’ll probably need a primer, or more coats of the Tarrago. I’m not sure but you may need to contact a cobbler / shoe repair shop for advice.
I want to try this for Comic Con and I wonder if you had any problem with the paint after you walk with the shoes.
This tutorial is for my original pair, which I was able to wear them all through a night of dancing at DragonCon and three other cons before having to do any touchups. They did eventually crack at the ball of the foot, but it was minor and has since been fixed. I’ve also just completed a second pair using pink leather dye from Tarrago. I haven’t tested those out at a con yet.
Hello, I’m curious if you’ve tested the leather dye set by now? I’m inclined to use that method but want to know how it worked for you?
Yes! I used Tarrago Leather Dye in Rose. It’s also an acrylic based dye/paint, but the color is spot on. Since the base shoes were the SA style in off-white – I had to clean the shoes, remove the shiny seal from the shoes using pure acetone + really fine grit sandpaper, paint/dye them (which did go on better than the paint – two coats versus 3-4, with no primer this time), and then seal them. Here’s a comparison picture of the old shoes I made (left) with the new ones (right).
https://scontent.fhou1-2.fna.fbcdn.net/v/t1.0-9/10639360_1165789753434365_348960244163053159_n.jpg?oh=a27a86203d84246b44b50ad7961a72e8&oe=59C14535
And a comparison pic of the shoes in progress (for color difference).
https://scontent.fhou1-2.fna.fbcdn.net/v/t1.0-9/12006338_1161861143827226_953170673713472302_n.jpg?oh=8209064605eec4ed916efca56ef42cdf&oe=59BF7D5C
You definitely have to make sure to get all of the seal off before you dye them.
[…] Rose Tyler – Idiot’s Lantern Shoes […]