 Materials:
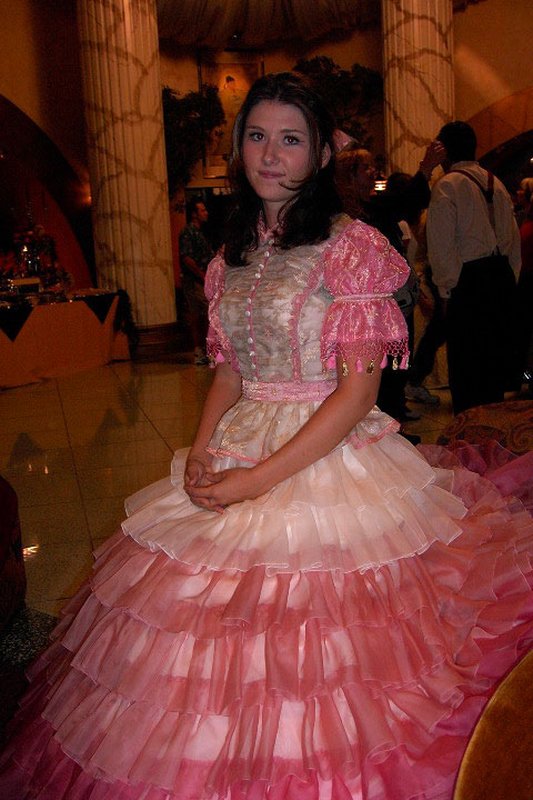
- Sparkle organza for the ruffles of the skirt – White, Light Pink, Flamingo Pink (my nod to Shawna Trpcic)
- White cotton poplin for the skirt base and bodice lining
- White embroidered poly organza for the bodice
- V2 – Embroidered ivory silk organza)
- Pink vintage silk sari for the sleeves, belt, and bow
- V2 used a vintage pink dupatta
V1 Trims (Cat # are from M&J Trimming)
- 02115 – Pink 15mm Organdy for under the buttons
- 02125 – Pink 25mm Organdy for the edge of the peplum and sleeves
- 02138 – Pink 38mm Organdy for the ‘belt’ on the bodice
- 41524 – Pink Ruffle Organdy for the ruffles on the bodice
- 13037 – 13mm White Bridal Buttons
- Pink and green gaudy tassel trim (from Hobby Lobby)
- Pink chainette fringe – It was evenutally knotted, trimmed, glued, and the tassels were sewn on from above trim
V2 Trims (Cat # are from M&J Trimming)
- 02115 – Pink 15mm Organdy for under the buttons
- 02125 – Pink 25mm Organdy for the edge of peplum and sleeves (folded over hem then sewn)
- 41524 – Pink ruffle Organdy for the ruffles on the bodice
- 13037 – 13mm White Bridal Buttons (reused from v1)
- Pink and yellow tassel trim found on ebay – tassels cut off and sewn onto lattice trim.
- Pink lattice trim found on ebay – ends cut off, glued w/fabric glue, and tassels sewn on from above trim.
Notes:
– I chose organza for the ruffles because that is what I believe to have been used (see reference images). That is definitely not chiffon.
– I recommend draping a pattern for your skirt OVER the hoop and petticoat you intend to use under it. I have since gone and expanded the skirt since I acquired a new petticoat. It’s SO FLUFFY!
– I drafted the pattern for both versions of the bodice. The second bodice is a standard princess seam w/ peplum, similar to this free pattern here. Just alter the neckline to a V. The sleeve pattern was drafted as well, and you can find a great tutorial on Youtube.
– Sleeves are also lined in cotton poplin to give them some heft. For v1 I dyed the organza and overlayed it onto the sari. For v2, it was already embroidered so I omitted that step.
- The white ruched part of the bodice at the front is actually about twice as long as the lining, ruched, and then serged onto the lining fabric.
- Originally I had made a belt of the wide organdy ribbon doubled over and sewn into the bodice, but I hated the look. I went back and made a belt using the sari fabric with the lighter pink organza over it. It closes with velcro – I need to change that to a hook and eye for security.
- A serger is your best friend on this. Instead of folding over the ends and sewing them with a blind hem, I roll-hemmed the edges. I need them to be durable (I’ve worn this dress in the Dragon*Con parade) and easy to repair if needed. So far this is working out quite well!
- Update: in 2014 I actually went back and folded over the hems and sewed them – the serging needed some repair after four years, so I just took care of it.
- The overskirt has about 50-60 yards of ruffles. There are EIGHT layers of ruffles: 2 White, 3 Light Pink, 3 Darker Pink. The top white “layer” is actually the peplum on the bodice.
- GET A RUFFLING FOOT! They will make the pleats on your ruffles even and then make it so much easier to sew onto the skirt. I actually ended up sewing on all of the layers by hand, but that didn’t hurt my feelings.
- Take. Your. Time. I cannot stress that enough. I got so fed up with this project it sat at about 80% for three weeks. I thankfully had a con coming up in 2010 that made me decide to go ahead and finish it.
Here it is, the costume that definitely enhanced my skills… The dress that took two months (well, mostly a month and some breathing time) to finish. The shiniest of shinies!
V1 – Construction Photos